Auto Sensing Light with LED Ring
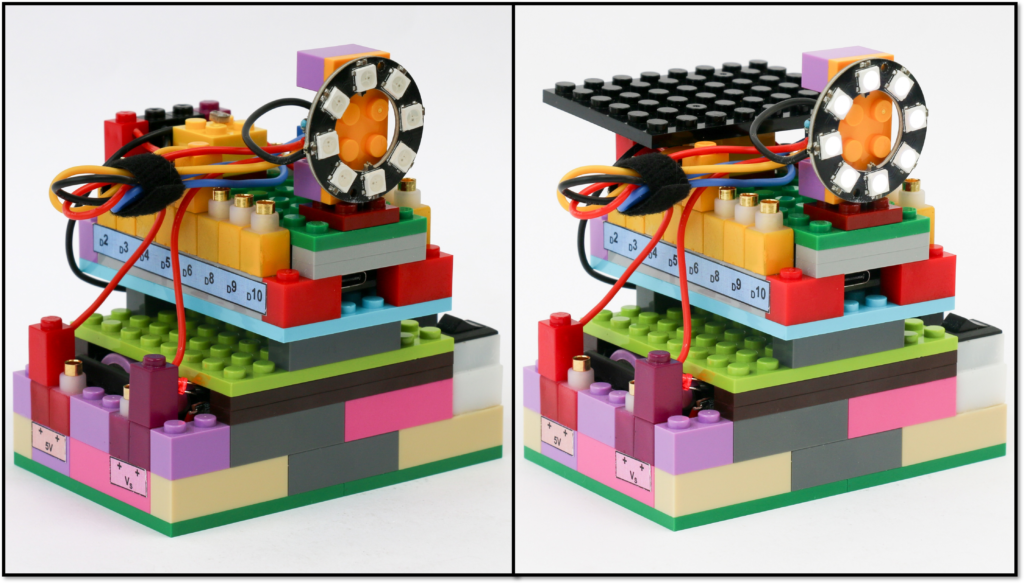
This project is an enhancement to the auto sensing light project built with a photoresistor and an LED block. In this project we are going to use an addressable LED ring instead of a single LED block
The LED ring we are using is called WS2812b which consists of multiple LEDs arranged on a ring. All the LEDs can be individually controlled using only one data pin. We will learn to use a library to control the brightness, the color and the trigger to switch the LED ring on or off based on LDR input.
Components
Connections
Connect the battery block Vs pin to the Vs pin of the microcontroller block. Connect any of black (negative) pins on the battery block to one of the negative (black) pin on the microcontroller block.
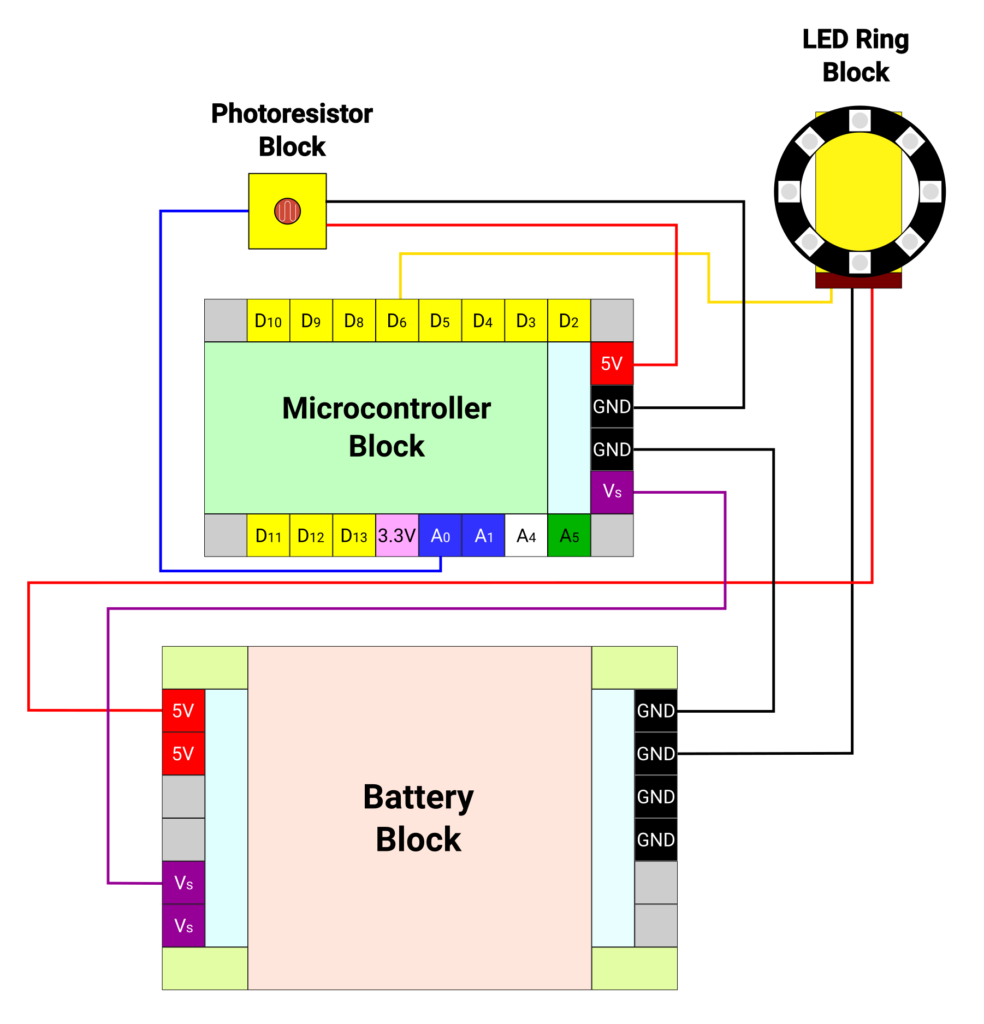
Connect the LED ring yellow terminal to the microcontroller pin D6. Connect the LED ring red and black terminals to the 5V (red) and negative (black) pin of battery block respectively.
Connect the red and black terminal of photoresistor block to 5V and negative pins on microcontroller block respectively. Connect the photoresistor blue terminal to microcontroller A0 pin.
Code
We will be using a library called “Adafruit_NeoPixel”. Under the Tools menu bar options in Arduino IDE, click on “Manage Libraries”. Search and install the Adafruit NeoPixel library.
We will call the Adafruit_NeoPixel library in the sketch first. We define pin D6 and number of LEDs in the ring. We call the library function to set up the LED ring with appropriate parameters. We define A0 pin as photoresistor pin. We also define a variable to store photoresistor value.
In the setup section, we initiate the ring object and set the brightness level of LEDs.
In the loop the sequence, we will read the value we get at the photoresistor pin using analogRead function. The value we get is between 0 and 1023. Higher the light lesser the resistance and higher the value we read. We set a threshold of 400 below which LED ring will switch on. We will use If statements to decide whether the LED ring needs to be switch on or off.
To switch the LED ring on, we run a for loop to define the RGB values of each of the LEDs in the ring. We have set up the values as 255, 225, 170 which creates a warm white color. We can define different colors for each of the LEDs if we want to. Once the RGB values are assigned, we use ring.show command to switch the LED ring.
To switch off the LED ring, we simply provide RGB values as zeros and show the LED ring.
/*
   Makernova Robotics 2025
   In this program we use a photoresistor to measure level of ambient light.
   Depending on the ambient light level, we switch LED on or off automatically
*/

#include <Adafruit_NeoPixel.h>

// Pin to use to send signals to WS2812B. We are using D6 as data pin
#define LED_PIN 6

// Number of WS2812B LEDs attached to the Arduino. We have 16 LED ring
#define LED_COUNT 8

// Setting up the NeoPixel library
Adafruit_NeoPixel ring(LED_COUNT, LED_PIN, NEO_GRB + NEO_KHZ800);

const int ldrPin = A0; //define A0 as photoresistor pin
int ldrVal = 0; //variable to store LDR value

void setup()
{
  ring.begin();             // Initialize NeoPixel object
  ring.setBrightness(127);  // Set BRIGHTNESS to about 50% (max = 255)
}

void loop()
{
  ldrVal = analogRead(ldrPin); //read the LDR value
  if (ldrVal < 400) { //if the value is less than 400, activate LED ring
    for (int i = 0; i < LED_COUNT; i++) {
      ring.setPixelColor(i, 255, 225, 170);
    }
    ring.show();
  } else {
    for (int i = 0; i < LED_COUNT; i++) { //if value more than 400, de-activate the LED ring
      ring.setPixelColor(i, 0, 0, 0);
    }
    ring.show();
  }
  delay(100); //repeat 10 times a second
}